Grain Spawn
Grain spawn is cooked, sterilized, and cooled grain that you inoculate from myceliated petri dishes or liquid culture (LC).
I sterilize grain spawn in canning jars with wide mouths (for ease of transferring) that have been fit with airport lids.
Many cultivators, including myself, soak the grains for ~10-24 hr. before cooking them (in fungus-friendly water). Keep this in mind in your work flow.
Grain Sourcing
I use liquid cultures (LC) in mason jars with airport lids so I can easily extract myceliated liquid with my syringe and then inject it into my grain spawn jars. Through LC method, I don't have to use a sterile lab environment or glovebox to expand the inoculum into the grain spawn, easing the work flow by quite a few steps. By using airport lids, I keep my grains pawn jar lids closed, in a safe sterilized container, and inoculate the grain using my LC via syringe needle.
Preparing Grain Spawn
Grain prep guiding principles:
I sterilize grain spawn in canning jars with wide mouths (for ease of transferring) that have been fit with airport lids.
Many cultivators, including myself, soak the grains for ~10-24 hr. before cooking them (in fungus-friendly water). Keep this in mind in your work flow.
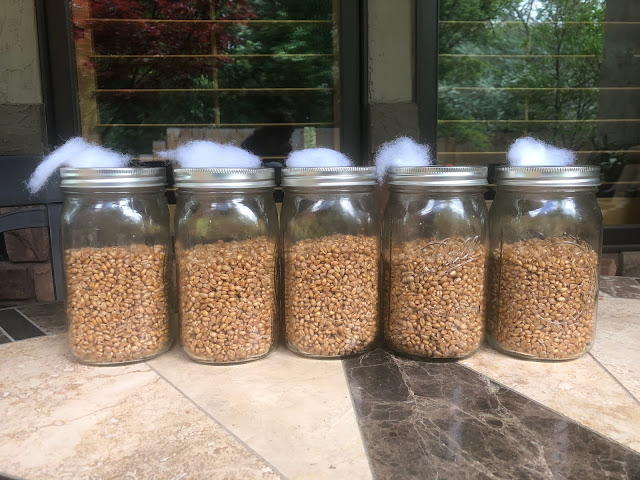 |
| Stage 10-11 of Grain Spawn Recipe. The grain spawn has been prepared, soaked, cooked, cooled, and equally(ish) filled into my 5 quart-sized mason jars with airport lids. Now ready to be covered in a foil cap and sterilized in the PC. |
Grain Sourcing
Commercially common grains used as spawn are usually rye grain (also called rye berries), millet, or wheat berries. Home cultivators have also seen success using spelt, popcorn, whole birdseed, sorghum (milo). All of these grains are preferred due to their low levels of nitrogen (N) and ease of preparation. Many other grains are too high in N, which can lead to overheating during mycelial growth or high contamination rates. Whatever the grain, higher vitamins and minerals will support a flourishing mycelium. A smaller grain provides more points for inoculation and will ease the growing of the mycelial web. I use rye grain, otherwise known as rye berries.
As with any step of cultivation, if you can acquire local and sustainably grown, organic, and regeneratively farmed grain -- this is where it's at! Mushroom cultivation that's beneficiary to the environment instead of damaging to it is our beautiful responsibility. If you can grow your own grain spawn, this is even cooler.
Inoculum Sourcing
Inoculum is the fungal tissue used to inoculate a substrate, like grain spawn, or used to infect a host organism. You can source your inoculum in a variety of ways:
- Cloning local mushrooms in agar or liquid culture. Local species and strains are going to be most resilient, strong, and adapted to your growing conditions.
- Buying or trading liquid cultures from local mushroom cultivators or websites.
- Buying or trading agar petri dishes from local mushroom cultivators or websites.
I use liquid cultures (LC) in mason jars with airport lids so I can easily extract myceliated liquid with my syringe and then inject it into my grain spawn jars. Through LC method, I don't have to use a sterile lab environment or glovebox to expand the inoculum into the grain spawn, easing the work flow by quite a few steps. By using airport lids, I keep my grains pawn jar lids closed, in a safe sterilized container, and inoculate the grain using my LC via syringe needle.
Preparing Grain Spawn
The highest quality spawn are grains that are properly prepared and loved prior to sterilization.
Grain prep guiding principles:
- Grains should be al dente! Just like your Italian noodle, grains should be just right -- not too hard and not too soft. They've gotta be just right. The key to look for is if your grains have no center, they are good to go! This makes them fully saturated and supple enough for mycelium to penetrate and digest.
- Grains should not be overcooked or too soft. There should be a minimum of sprouted or burst kernels after sterilizing in the pressure cooker (or other sterilization method). Overcooked, burst, and/or overly wet grains make the grains more prone to contamination since their outer protective layers are now broken.
- Grains should be easy to break up. Dirty or overcooked grains can stick together, making it difficult for mycelium to grow and/or later be broken up during spawning. Pre-rinsing grains and adding hydrated lime helps reduce the risk of stickiness (and the lime raises pH levels).
 |
| My 5 quart jars of spawn, with foil caps on, ready to be PCd for 70 min. Just going to secure the lid, place on stove, and turn on heat. Water is already in the PC. NEVER run your PC without water inside!!! |
Basic Grain Spawn Recipe for 5 quart jars:
5 quart jars should be more than enough for you to get started. Remember that each quart jar of grain spawn you myceliate, you will then expand into fruiting substrate. You can double or triple this recipe if you're making larger quantities.
- Measure out 5 cups of dry grain into a large pot. (1 cup of dry grain per 1 quart jar.)
- Fill the pot with water and stir the grains to suspend any dirt and debris that might be on the grains.
- Pour off this dirty water and continue rinsing the grains until the water runs clear.
- Cover the grains with high quality, fungus-friendly water. Tap water usually contains chlorine, and a host of other sanitizing chemicals, which fungi do not like to eat. For all fungal applications, use rain water or local well/spring water. Findaspring.com is a great resource.
- Cover the pot and let it sit for 10-24 hours. Some cultivators soak their grains in 50% strength coffee to add additional nitrogen.
- Soaking grains for 10-24 hours helps germinate the dormant endospores of bacteria inside the grains, making these endospores more susceptible to the heat of the PC. The amount of water when soaking should be minimal, I just cover my grains with an inch or two of water over night and then use this same water to boil them in. Too much water used while boiling will lead to beneficial nutrients leaching out of the grains. Smaller grain (like millet) don't need to be cooked as soaking will provide adequate hydration. Always check before you cook your grains, because sometimes soaking can make them soft enough to not need to boil, or only for a couple minutes.
- Place the pot on the stove (I just soak on the stove so everything's ready and in place) and bring the grains to a boil for 5-10 minutes or until they are cooked to the right consistency.
- Drain the grains through a colander that doesn't have large enough holes for the grains to fall through. I save this nutrient-rich water to use for incorporating into agar and liquid media recipes.
- Toss the hot grains around until they have cooled and the excess moisture has your substrate prep screen to speed cooling.
- Depending on the batch size, I will either just periodically toss the grains as they're cooling outside in a bowl or collander. Or I will spread them out on substrate prep screen -- just some sort of wire mesh material to provide air circulation for quick drying. I use 1/2" yard fencing/"cloth".
- Add 1 tablespoon of hydrated lime to the grains to provide calcium and sulphur for the mycelium.
- Fill each quart jar equally, about halfway full, with your cooled grain spawn.
- Seal each jar with an airport llid and cover the lid with an aluminum foil cap.
- Pressure cook the jars for at least 60-75 minutes at 15 psi. Grains can also be tyndallized in the absence of a pressure cooker.
- Make sure you place a PC rack at the bottom of the PC, for the jars to rest on.
- Make sure to fill up your PC with enough water so it doesn't dry during cooking, which can be dangerous. I fill up my PC with 8 cups of tap water, if I'm running my PC for ~75 min. If I'm running my PC for over 75 min, I will fill up with 10+ cups of water.
- Altitude will change the amount of time you need to PC for. In Utah, at 4,000-7,000 feet in elevation, I definitely PC for closer to 75 minutes. This means that I count 75 minutes from the time my PC begins "PSSS"ing, not 75 minutes from the time I turned the stove on.
- Each PC has their own ins and outs, so please do read the manual before using your own PC. Safety is #1 priority.
- I use a 22 quart Mirro pressure cooker and this works great for my needs. All American also works well, but these are a bit pricier. PCs replace the commercial cultivation tool of the autoclave.
- I turn on my stove to med-high for about 4-5 minutes, and then turn my stove on high. If the PC heats too quickly, the glass jars inside could break. I haven't had any jars break on me yet.
- Once the stove is on high, the PC will begin to warm and steam will begin collecting inside. After about 10-15 minutes, when some steam has gathered, now is the time to place the 15 PSI weight on top of the PC lid. Different PCs have different weights -- perhaps it's a rocker top.
- Now that the 15 PSI weight is on, it usually takes another ~5 minutes to hear the first "PSSST". Once you've heard this, NOW is when to begin timing your 60-75 minutes. When you hear the first "PSSST", turn down the heat just a few ticks until you only hear about one "PSSST" per minute. You'll get the feel of it the more that you PC and understand your burner's heat. I turn my burner down to a knick above med-high.
- After PCing, turn off the stove and let the PC cool overnight. You do not want to open up the PC before cooling as the PC could explode, or the glass jars inside can crack if they cool too quickly.
- In the morning, or after several hours, open the PC and remove the jars. Inspect each jar for cracks and/or an excessive number of burst kernels. Discard any cracked jars.
Congratulations! You've got sterilized grain spawn to inoculate and then expand into your fruiting substrate, on which the mushrooms shall grow!!


Comments
Post a Comment